My Favorite Sailing Rigs and Why, by Iain Oughtred

Do I have a favorite rig? Well, it depends what kind of a boat are we talking about, where it’s sailed, what the prevailing weather is, how experienced the skipper and crew are, and what the mooring and/or launching situation is. In the following, I will be thinking mostly of open centerboarders up to around 20′ overall, which is what I mostly work with.
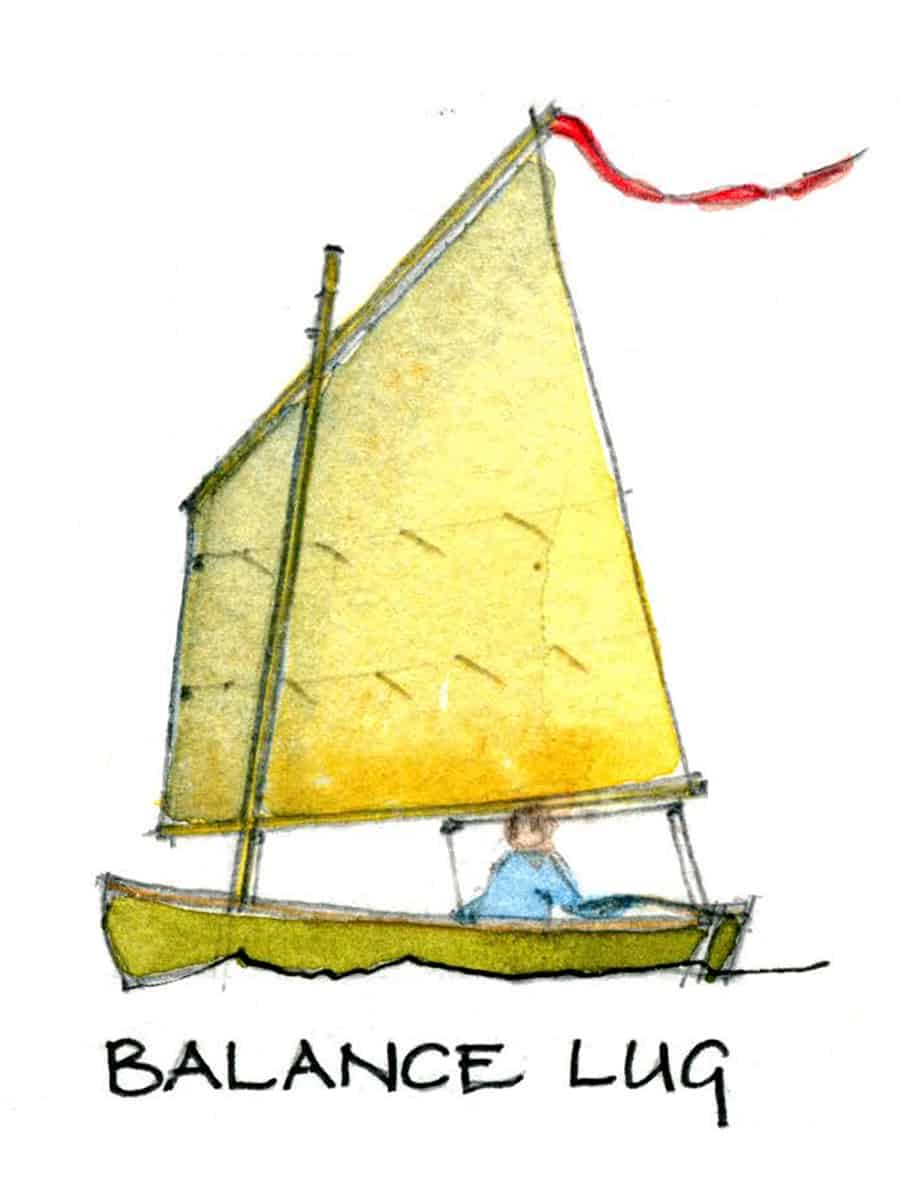
Reefing a balanced lug does not shift the center of effort forward like a triangular sail does to give the boat a lee helm. Like other lugsails, the balanced lug can be dropped quickly and with an extra-long sheet you can feather the sail out ahead to spill the wind.
Usually this kind of sail is set on the port side of the mast (although, for clarity, the illustration has it set to starboard). This means that on the port tack, it is leaning against the mast and seems to be on the wrong side. In theory, this is aerodynamically undesirable. But in practice it still works fine and you still can watch the lifting of the luff to confirm your close-hauled course. This is a simple rig, and efforts to make it too complex and sophisticated seem inappropriate.

As with the lugsails, if you’re on the wrong tack, you will have the sail cutting across the sprit, but the effect is hardly noticeable because the sprit sags and bends away from the mast. Two things are required for a spritsail to set well: A sufficient angle between the sprit and the head of the sail, and the snotter set up so it can be easily trimmed to maintain the right tension. If you’re not too particular, you can take up on the snotter until there is a bit of a wrinkle from tack to peak and forget about it. Or if you’re the type who is disturbed by wrinkles in the sail, you may want a cam cleat for the snotter so it can be quickly adjusted to suit every variation in wind speed or change of course.
A loose-footed spritsail needs to be sheeted right, so it is advisable to have three or four thumb-cleats at the gunwale. In theory, the sheet needs to be led further forward as it’s eased for reaching and running. Since I’m not too keen on reaching to leeward to place the sheet at each change of tack, I fitted double sheets and enclosed leads so the sail can be quickly sheeted in as the boat falls away on a new tack. This, however, makes it harder to shift the sheet lead, but standard thumb-cleats could be added for this.
Pete Culler provides a lot of good detail on the spritsail, and delights in pointing out the simplicity of rigging one, using no store-bought fittings. Any problems are easily fixable with minimal disruption. A small spritsail can be even rigged without a halyard. It can either be brailed up and the whole rig quickly unstepped, as is, or the snotter can be cast off, the peak lowered away, and the rig bound up into a neat package the same length as the mast, and laid inside the boat.
Reefing is straightforward. Two things to bear in mind are that the sheet will need extra leads at the gunwale, further forward, and the sprit comes down lower in the boat and extends a little further forward of the mast. If the snotter is high enough on the mast, this should not be a problem for the first reef. Or an extra thumb cleat may be fitted for the snotter higher on the after side of the mast.

The gunter sail may have a straight luff when the yard is set right along the mast, like an extension of it. Or the yard can be less vertical, up to around 10 degrees, until it is almost like a high-peaked gaff rig. In many light, open boats the shorter mast of a gunter rig can be much easier to step single-handed, to transport, and to maintain. When reefed, there are several feet less mast up there, where the windage and weight are especially undesirable and even dangerous in hard weather or a sudden squall. The single halyard generally has take-off points higher up the yard corresponding to each reef, but this means lowering the sail to shift the halyard each time you have to reef. To avoid this, I like a separate halyard at the throat and an adjustable peak line with parrels that dead-ends on one side of the yard, goes around the mast, and back to a small sheave on the opposite side of the yard, then leads down to a jamb cleat at the heel. I once thought this line should lead all the way down to the deck to avoid having to lower away the yard for reefing or to make adjustments, but in practice, you quickly see how far the yard should be off the mast, allowing a little more for stretch in a stronger breeze. When hoisting a gunter sail rigged this way, it is first peaked up vertically, then hoisted by the throat halyard. To restrain the yard and sail as they’re being lowered, a light lazyjack line leads from the masthead down through an eye on the underside of the boom, then back up to the masthead on the other side.

A significant drawback in converting old gaff-riggers to Marconi has been only gradually realised. The shroud and stay tension to support the taller mast and to achieve a straight luff on the taller headsails tries to shove the mast down through bottom of the boat, stressing the hull in ways it had not been built for, and often showing up as a hogged sheerline as well as through leaking. As the restoration movement took off and many old yachts were converted back to their original gaff rig, to the skippers’ surprise, some sailed a little better, with less effort, and with less stress on the boat and crew. Even close-hauled, the theoretically-inferior aerodynamics are compensated for by the extra sail that could safely be carried on the shorter mast.

HEADSAILS: I prefer small ones because they are less stressful on both the rig and the hull. And on the crew also, being quick to tack and less demanding of strength, agility, and well-timed work on the winches. In classes where the total sail area was limited, and without restrictions on how the square footage was arranged, there’s a fairly consistent tend toward a high aspect ratio, three-quarter sloop rig in which the jib would be around 1/3 or 1/4 of the total sail area.
MY FAVORITE RIG would have a fully-battened sail, which is what I grew up with. It appeared long ago on the International 10 Square Meter canoes, the elegant German Renjollen of the 1930s, and the Scow Moths. Battens allow the sail to have more roach, which in turn gives a lot of extra sail area, without very long spars. The roach may comprise more than a quarter of the area; in fact, maybe even one third. Full-length battens quiet a sail when tacking and in a strong breeze. With sheets eased, the sail just luffs gently instead of flogging violently. With non-stretchy sail cloth, only a few battens will do the job. I like the way you can always see exactly that the shape and draft in the sail are. These battens are often made of ash or spruce, which are tough woods, but break occasionally. Nowadays, battens are usually of fiberglass in mass-produced class boats, but wood has advantages in that it can be easily trimmed to vary the stiffness. Made thin and flexible near the luff, and fairly stiff towards the leech, wood battens fall naturally into the right aerodynamic shape. In light weather, they can be pushed in tight to encourage them to bow into shape with little or no wind pressure, while in a fresh breeze, the tension may be eased to eliminate wrinkles. Full-length battens have also been used in larger craft, as in Ralph Munroe’s famous Egret sharpie. Although such a sail is very well-behaved and efficient, it makes an awkward bundle when removed from the boat.
* * *
OffCenterHarbor appreciates the use of the lovely illustrations by Roger Barnes that we’ve used with Iain’s post. They’re from Roger’s new book called The Dinghy Cruising Companion, about which OCH members will soon be hearing more. For now, we’ll just say that it is indeed a great companion, and one of the best small boat books we’ve seen.